Quickstart: Quilkin with Agones and Xonotic (Relay)
Requirements
- A terminal with
kubectlinstalled - A local copy of the Xonotic client
- A running Agones Kubernetes cluster
- Installation instructions
- If you aren't familiar with Agones, we recommend working through their Getting Started guides.
- A local copy of the Quilkin Binary.
1. Overview
In this quickstart, we'll be setting up an example multi-cluster
Xonotic Agones Fleet, that will
only be accessible through Quilkin, via utilising the TokenRouter Filter to
provide routing and access control to the Allocated GameServer instances.
To do this, we'll take advantage of the Quilkin Relay to provide an out-of-the-box multi-cluster xDS control plane, and the Agones Agent to send information from the cluster(s) to the relay, which can be used as a management server for each of the Quilkin Proxy instances.
While the application of
quilkin relayis to ultimately provide a solution where multiple clusters feed configuration information into a single relay endpoint via aquilkin agent, in this example we'll use a single cluster for demonstrative purposes.
2. Install Quilkin Relay and Agones Agent
To install Quilkin as an Agones integrated relay control plane, we can create a deployment of Quilkin running as
quilkin relay with a corresponding Agones agent, quilkin agent agones, with the appropriate permissions.
Run the following:
kubectl apply -f https://raw.githubusercontent.com/googleforgames/quilkin/main/examples/agones-xonotic-relay/relay-control-plane.yaml
This applies several resources to your cluster:
- A ConfigMap with a Capture and TokenRouter Filter set up to route packets to Endpoints, to be the base configuration for all the Quilkin proxies.
- Appropriate RBAC permissions for the
quilkin agent agonesprocess to inspect Agones resources. - A Deployment that runs the
quilkin relayprocess, a matching Deployment for thequilkin agentprocess and a Service that the Quilkin agents can send configuration information to, and the Proxies can connect to, to get their Filter and Endpoint configuration from.
Now we can run kubectl get pods until we see that the Pod for the Deployment is up and running.
$ kubectl get pods
NAME                                    READY   STATUS    RESTARTS   AGE
quilkin-agones-agent-9dd6699bd-qh7cq    1/1     Running   0          6s
quilkin-relay-agones-55fbd69f5d-cdh9k   1/1     Running   0          6s
We can now run kubectl get service quilkin-relay-agones and see the
service that is generated in front of the above Quilkin Relay Deployment for our Quilkin Proxies to connect to and
receive their configuration information from.
$ kubectl get service quilkin-relay-agones
NAME                   TYPE        CLUSTER-IP       EXTERNAL-IP   PORT(S)             AGE
quilkin-relay-agones   ClusterIP   10.103.243.246   <none>        7800/TCP,7900/TCP   57s
3. Install Quilkin Proxy Pool
To install the Quilkin Proxy pool which connects to the above Relay xDS provider, we can create a Deployment of Quilkin proxy instances that point to the aforementioned Service, like so:
kubectl apply -f https://raw.githubusercontent.com/googleforgames/quilkin/main/examples/agones-xonotic-relay/proxy-pool.yaml
This will set up three instances of Quilkin running as quilkin proxy --management-server http://quilkin-relay-agones:7900 all of which are connected to the quilkin-relay-agones service.
Now we can run kubectl get pods until we see that the Pods for the proxy Deployment is up and running.
$ kubectl get pods
NAME                                    READY   STATUS    RESTARTS   AGE
quilkin-agones-agent-9dd6699bd-5brzf    1/1     Running   0          18s
quilkin-proxies-7d9bbbccdf-5mz4l        1/1     Running   0          7s
quilkin-proxies-7d9bbbccdf-9vd59        1/1     Running   0          7s
quilkin-proxies-7d9bbbccdf-vwn2f        1/1     Running   0          7s
quilkin-relay-agones-55fbd69f5d-k2n7b   1/1     Running   0          18s
Let's take this one step further, and check the configuration of the proxies that should have come from the quilkin agent agones instance and passed through the quilkin relay instance into each of the proxies.
In another terminal, run: kubectl port-forward deployments/quilkin-proxies 8001:8000, to port forward the
admin endpoint locally to port 8001, which we can then query.
Go back to your original terminal and run curl -s http://localhost:8001/config
If you have jq installed, run
curl -s http://localhost:8001/config | jqfor a nicely formatted JSON output.
$ curl -s http://localhost:8001/config | jq
{
  "clusters": [
    {
      "endpoints": [],
      "locality": null
    }
  ],
  "filters": [
    {
      "name": "quilkin.filters.capture.v1alpha1.Capture",
      "label": null,
      "config": {
        "metadataKey": "quilkin.dev/capture",
        "suffix": {
          "size": 3,
          "remove": true
        }
      }
    },
    {
      "name": "quilkin.filters.token_router.v1alpha1.TokenRouter",
      "label": null,
      "config": null
    }
  ],
  "id": "quilkin-proxies-7d9bbbccdf-9vd59",
  "version": "v1alpha1"
}
This shows us the current configuration of the proxies coming from the xDS server created via quilkin agent agones. The most interesting part that we see here, is that we have a matching set of
Filters that are found in the ConfigMap in the
relay-control-plane.yaml
we installed earlier.
4. Create the Agones Fleet
Now we will create an Agones Fleet to spin up all our Xonotic game servers.
Thankfully, Agones Fleets require no specific configuration to work with Quilkin proxies, so this yaml is a standard Agones Fleet configuration
kubectl apply -f https://raw.githubusercontent.com/googleforgames/quilkin/main/examples/agones-xonotic-relay/fleet.yaml
Run kubectl get gameservers until all the GameServer records show that they are Ready and able to take players.
$ kubectl get gs
NAME                  STATE       ADDRESS         PORT   NODE                               AGE
xonotic-8ns7b-2lk5d   Ready       39.168.219.72   7015   gke-agones-default-ad8cd7e5-3b12   1m
xonotic-8ns7b-hrc8j   Ready       39.168.219.72   7298   gke-agones-default-ad8cd7e5-3b12   1m
xonotic-8ns7b-mldg6   Ready       39.168.219.72   7558   gke-agones-default-ad8cd7e5-3b12   1m
5. Allocate a GameServer
To let the Quilkin Agones Agent know what token will route to which GameServer we need to apply the
quilkin.dev/tokens annotation to an allocated GameServer, with the token content as its value.
This token would normally get generated by some kind of player authentication service and passed to the client via the matchmaking service - but for demonstrative purposes, we've hardcoded it into the example
GameServerAllocation.
Since you can add annotations to GameServers at
allocation time, we can both allocate a GameServer
and apply the annotation at the same time!
kubectl create -f https://raw.githubusercontent.com/googleforgames/quilkin/main/examples/agones-xonotic-relay/gameserverallocation.yaml
If we check our GameServers now, we should see that one of them has moved to the Allocated state, marking it as
having players playing on it, and therefore it is protected by Agones until the game session ends.
$ kubectl get gs
NAME                  STATE       ADDRESS         PORT   NODE                               AGE
xonotic-8ns7b-2lk5d   Allocated   39.168.219.72   7015   gke-agones-default-ad8cd7e5-3b12   17m
xonotic-8ns7b-hrc8j   Ready       39.168.219.72   7298   gke-agones-default-ad8cd7e5-3b12   17m
xonotic-8ns7b-mldg6   Ready       39.168.219.72   7558   gke-agones-default-ad8cd7e5-3b12   17m
Don't do this more than once, as then multiple allocated
GameServerswill have the same routing token!
If we kubectl describe gameserver <allocated-gameserver> and have a look at the annotations section, we
should see something similar to this:
❯ kubectl describe gs xonotic-8ns7b-2lk5d
Name:         xonotic-8ns7b-2lk5d
Namespace:    default
Labels:       agones.dev/fleet=xonotic
              agones.dev/gameserverset=xonotic-8ns7b
Annotations:  agones.dev/last-allocated: 2023-10-04T19:47:04.047026419Z
              agones.dev/ready-container-id: containerd://b39d30965becdbc40336fd9aa642fe776421553615f642dd599e1b0d88c505b6
              agones.dev/sdk-version: 1.40.0
              quilkin.dev/tokens: NDU2
API Version:  agones.dev/v1
Kind:         GameServer
...
Where we can see that there is now an annotation of quilkin.dev/tokens with the base64 encoded version of 456 as
our authentication and routing token ("NDU2").
You should use something more cryptographically random than
456in your application.
Let's run curl -s http://localhost:8001/config again, so we can see what has changed!
❯ curl -s http://localhost:8001/config | jq
{
  "clusters": [
    {
      "endpoints": [
        {
          "address": "39.168.219.72:7015",
          "metadata": {
            "quilkin.dev": {
              "tokens": [
                "NDU2"
              ]
            },
            "name": "xonotic-8ns7b-2lk5d"
          }
        }
      ],
      "locality": null
    }
  ],
  "filters": [
    {
      "name": "quilkin.filters.capture.v1alpha1.Capture",
      "label": null,
      "config": {
        "metadataKey": "quilkin.dev/capture",
        "suffix": {
          "size": 3,
          "remove": true
        }
      }
    },
    {
      "name": "quilkin.filters.token_router.v1alpha1.TokenRouter",
      "label": null,
      "config": null
    }
  ],
  "id": "quilkin-proxies-7d9bbbccdf-9vd59",
  "version": "v1alpha1"
}
Looking under clusters > endpoints we can see an address and token that matches up with the
GameServer record we created above!
The Agones agent process saw that allocated GameServer, turned it into a Quilkin Endpoint and applied the set
routing token appropriately -- without you having to write a line of xDS compliant code!
Connecting Client Side
Instead of connecting to Xonotic or an Agones GameServer directly, we'll want to grab the IP and exposed port of
the Service that fronts all our Quilkin proxies and connect to that instead -- but we'll have to append our
routing token 456 from before, to ensure our traffic gets routed to the correct Xonotic GameServer address.
Run kubectl get service quilkin-proxies to get the EXTERNAL-IP of the Service you created.
$ kubectl get service quilkin-proxies
NAME              TYPE           CLUSTER-IP    EXTERNAL-IP     PORT(S)          AGE
quilkin-proxies   LoadBalancer   10.109.0.12   35.246.94.14    7777:30174/UDP   3h22m
We have a Quilkin config yaml
file all ready for you, that is configured to append the routing token 456 to each
packet that passes through it, via the power of a
Concatenate Filter.
Download client-token.yaml locally, so you can edit it:
curl https://raw.githubusercontent.com/googleforgames/quilkin/main/examples/agones-xonotic-relay/client-token.yaml --output client-token.yaml
We then take the EXTERNAL-IP and port from the quilkin-proxies service, and replace the${LOADBALANCER_IP}
with it in client-token.yaml.
Run this edited configuration locally with your quilkin binary as quilkin -c ./client-token.yaml proxy:
$ ./quilkin --config ./client-token.yaml proxy
2023-10-04T20:09:07.320780Z  INFO quilkin::cli: src/cli.rs: Starting Quilkin version="0.7.0-dev" commit="d42db7e14c2e0e758e9a6eb655ccf4184941066c"
2023-10-04T20:09:07.321711Z  INFO quilkin::admin: src/admin.rs: Starting admin endpoint address=[::]:8000
2023-10-04T20:09:07.322089Z  INFO quilkin::cli::proxy: src/cli/proxy.rs: Starting port=7777 proxy_id="markmandel45"
2023-10-04T20:09:07.322576Z  INFO quilkin::cli::proxy: src/cli/proxy.rs: Quilkin is ready
2023-10-04T20:09:07.322692Z  INFO qcmp_task{v4_addr=0.0.0.0:7600 v6_addr=[::]:7600}: quilkin::protocol: src/protocol.rs: awaiting qcmp packets v4_addr=0.0.0.0:7600 v6_addr=[::]:7600
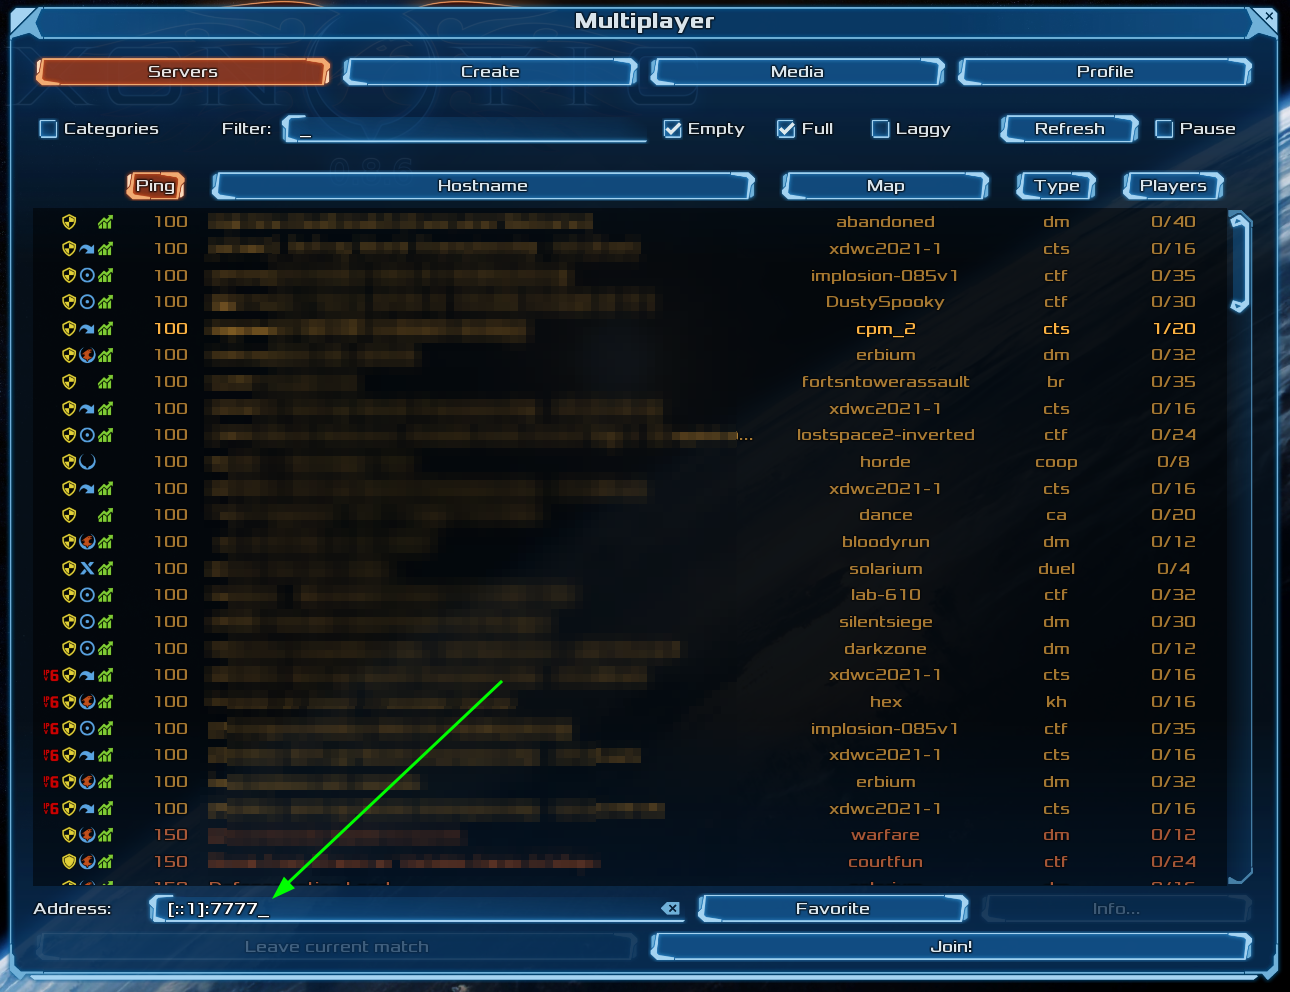
Now connect to the local client proxy on "[::1]:7777" via the "Multiplayer > Address" field in the Xonotic client, and Quilkin will take care of appending the routing token to all your UDP packets, which the Quilkin proxies will route to the Allocated GameServer, and you can play a gamee!
...And you didn't have to change the client or the dedicated game server 🤸
What's Next?
- Check out the variety of Filters that are possible with Quilkin.
- Read into the xDS Management API.